Introduction ============

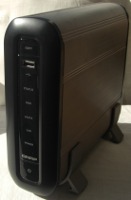
This document describes in depth how to prepare your QNAP Turbo Station for installing NetBSD/sandpoint. The following models are supported:

  • TS-100 (32MB, 200MHz, Intel GBit Ethernet, V1.02 board)
  • TS-100 (32MB, 200MHz, Realtek GBit Ethernet, V200 board)
  • TS-101 (64MB, 266MHz, Intel GBit Ethernet, V1.02 board)
  • TS-101 (64MB, 266MHz, Realtek GBit Ethernet, V200 board)
  • TS-201 (128MB, 266MHz, Realtek GBit Ethernet)

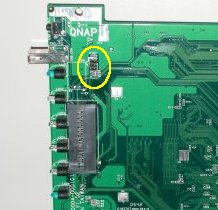
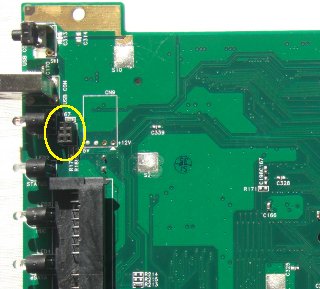
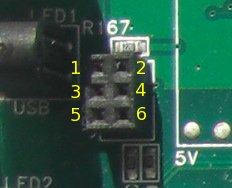
To install NetBSD/sandpoint you will have to open the case, to get access to the serial console, and connect a serial converter from TTL to RS232 signal levels.

TS-101 front view
Accessing the serial interface ============================== Locate the serial header ------------------------ There is a 6-pin header near the LEDs, labeled `JP2`. On the V1.02 board it is a male connector with pins (left picture), while it is a female socket on V200 boards (right picture). Nevertheless, the signal assignments on both connectors are the same.
TS-101 V1.02 board TS-101 V200 board
**Serial header pin assignments (both boards):**
Pin number Function
1 3.3V
2 GND
4 TX
6 RX
Header pin assignments
Connect a serial cable ---------------------- The Turbo Station's serial port is using 3.3V TTL levels, which have to be converted into regular RS232 levels by a level shifter circuit. If you are not anxious using a soldering iron you find detailed instructions how to build such a converter here: - [Serial adapter for 3.3V TTL](http://www.netbsd.org/ports/sandpoint/ttl2rs232.html) Another option is to buy such a converter. There are solutions for a standard RS232 interface and for an USB interface. Look out for: - RS232 level shifter / breakout board (MAX3232 based) - USB to TLL serial level shifter / breakout board (FT232 based) First installation ================== Accessing the Firmware ---------------------- Provided the serial converter is installed and working correctly you should be able to connect to the firmware's serial console. QNAP is using [U-Boot](http://www.denx.de/wiki/U-Boot/), the Universal Boot Loader. Now you can connect with any terminal program to the Turbo Station's serial console. The easiest approach may be to use NetBSD's `tip(1)` command to make a direct console connection at 115200bps. # tip -115200 console Note that when using a serial connection via USB you may have to make an entry for `/dev/ttyU0` in `/etc/remote`. Immediately after switching your Turbo Station on it will display the following information (output is from a TS-101) and gives you two seconds to stop autobooting. U-Boot 1.1.2 (Aug 28 2005 - 13:37:25) QNAP System, Inc. CPU: MPC8245 Revision 1.4 at 266.666 MHz: 16 kB I-Cache 16 kB D-Cache Board: Sandpoint 8245 Unity ##Test not implemented yet## I2C: ready DRAM: 64 MB FLASH: S29GL128N, 16 MB In: serial Out: serial Err: serial Net: No ethernet found. Hit any key to stop autoboot: 1 altboot ------- The `altboot(8)` utility functions as a bridge between the QNAP firmware and the NetBSD kernel startup environment. NAS firmware often provides no means to boot a kernel from disk or from the network and doesn't initialize all hardware correctly. We will also use it to pass a bootinfo list to the kernel. The `altboot` boot loader has to be loaded and started using U-Boot. Usually there are three ways to invoke it: - **loadb** to load a binary file via serial line in kermit mode - **tftpboot** to load a binary file over the network with TFTP protocol - start it from the flash memory The last option is prefered once the installation is completed, but obviously it is not possible for the first time boot. As QNAP's U-Boot also lacks network functionalities in this version, we will download `altboot` into RAM with Kermit protocol over the serial line. Install `kermit(1)` from `pkgsrc(7)` or compile and install it yourself. To set up the file transfer you have to provide the following commands to kermit: set line /dev/tty00 set speed 115200 set carrier-watch off set flow-control none robust set file type bin For convenience you can write them into a file which you can pass as an argument to `kermit`. Load `altboot` into memory with Kermit protocol. The binary is relocated at 0x1000000, so type:
=> loadb 1000000
## Ready for binary (kermit) download to 0x01000000 at 115200 bps...
Now quit your terminal program and launch **kermit cmdfile**. When you are already running `kermit` enter the command mode by typing **CTRL-\\** followed by **C**. Then send `altboot.bin`. Reconnect when the transfer is finished.
C-Kermit 8.0.211, 10 Apr 2004, for NetBSD 1.6
 Copyright (C) 1985, 2004,
  Trustees of Columbia University in the City of New York.
Type ? or HELP for help.
(/tmp/) C-Kermit>send path_to/altboot.bin
Boot the INSTALL kernel with altboot ------------------------------------ Now you can use `altboot` to launch the `netbsd-INSTALL` kernel for installing NetBSD. You may choose to load it via TFTP or from NFS. For TFTP you have to enable `tftpd(8)` in `/etc/inetd.conf`, and for NFS there is a documentation at [The Network File System](http://www.NetBSD.org/docs/guide/en/chap-net-services.html#chap-net-services-nfs). But in both cases you have to set up a DHCP server, which is explained in the [DHCP Howto](http://www.NetBSD.org/docs/network/dhcp.html). An appropriate `dhcpd.conf` entry could look like this: host turbostation { hardware ethernet 00:e0:4c:xx:xx:xx; fixed-address 192.168.0.104; next-server 192.168.0.1; option root-path "/export/turbostation/root"; } The `root-path` option is only needed when using NFS and should match your exported NFS directory. Uncompress `netbsd-INSTALL.gz` from the NetBSD/sandpoint distribution and copy it into the NFS or TFTP directory. Run altboot and press a key to enter interactive mode:
=> go 1000000
## Starting application at 0x01000000 ... >> NetBSD/sandpoint altboot, revision 1.7 (Sat May 28 12:36:26 CEST 2011) >> QNAP TS, cpu 265 MHz, bus 132 MHz, 64MB SDRAM wd0: DMA LBA LBA48 476940 MB wd0: no disklabel MAC address 00:e0:4c:xx:xx:xx 100Mbps-FDX Hit any key to enter interactive mode: 0 Then start the DHCP, NFS or TFTP server and boot the installation kernel from the firmware either with:
=> tftp:netbsd-INSTALL
or from NFS:
=> nfs:netbsd-INSTALL
At the time of writing the network transfer will fail for the first time after cold start. After an automatic reset, caused by five xmit failures, it should succeed. This will hopefully improve in future. Our bootloader configures the hardware, determines the IP address, loads the kernel via network and launches it: loading "netbsd-INSTALL" 5143540+110580=0x503068 entry=0x90000, ssym=0x592be8, esym=0x593068 Copyright (c) 1996, 1997, 1998, 1999, 2000, 2001, 2002, 2003, 2004, 2005, 2006, 2007, 2008, 2009, 2010, 2011 The NetBSD Foundation, Inc. All rights reserved. Copyright (c) 1982, 1986, 1989, 1991, 1993 The Regents of the University of California. All rights reserved. NetBSD 5.99.52 (INSTALL) #6: Sat May 28 12:44:03 CEST 2011 frank@compaq.owl.de:/home/frank/netbsd/current/src/sys/arch/sandpoint/compile/obj/INSTALL total memory = 65536 KB avail memory = 57980 KB OpenPIC Version 1.2: Supports 1 CPUs and 26 interrupt sources. mainbus0 (root) cpu0 at mainbus0: 8245 (Revision 0.4), ID 0 (primary) cpu0: HID0 0x90c000, powersave: 1 eumb0 at mainbus0 com0 at eumb0 unit 0: ns16550a, working fifo com0: console com0: interrupting at irq 40 ociic0 at eumb0 iic0 at ociic0: I2C bus s390rtc0 at iic0 addr 0x30: Seiko Instruments 35390A Real-time Clock satmgr0 at eumb0 unit 1: button manager (qnap) satmgr0: interrupting at irq 41 pci0 at mainbus0 bus 0 pchb0 at pci0 dev 0 function 0 pchb0: vendor 0x1057 product 0x0006 (rev. 0x14) satalink0 at pci0 dev 13 function 0: Silicon Image SATALink 3512 (rev. 0x01) satalink0: using irq 16 for native-PCI interrupt atabus0 at satalink0 channel 0 atabus1 at satalink0 channel 1 ohci0 at pci0 dev 14 function 0: vendor 0x1033 product 0x0035 (rev. 0x43) ohci0: interrupting at irq 17 ohci0: OHCI version 1.0 usb0 at ohci0: USB revision 1.0 ohci1 at pci0 dev 14 function 1: vendor 0x1033 product 0x0035 (rev. 0x43) ohci1: interrupting at irq 17 ohci1: OHCI version 1.0 usb1 at ohci1: USB revision 1.0 ehci0 at pci0 dev 14 function 2: vendor 0x1033 product 0x00e0 (rev. 0x04) ehci0: interrupting at irq 17 ehci0: companion controllers, 3 ports each: ohci0 ohci1 usb2 at ehci0: USB revision 2.0 re0 at pci0 dev 15 function 0: RealTek 8169SC/8110SC Single-chip Gigabit Ethernet (rev. 0x10) re0: interrupting at irq 18 re0: Ethernet address 00:e0:4c:xx:xx:xx rgephy0 at re0 phy 7: RTL8169S/8110S/8211 1000BASE-T media interface, rev. 2 rgephy0: 10baseT, 10baseT-FDX, 100baseTX, 100baseTX-FDX, 1000baseT, 1000baseT-FDX, auto biomask 8000038 netmask 8000038 ttymask 8000038 satalink0: port 0: device present, speed: 1.5Gb/s wd0 at atabus0 drive 0 wd0: wd0: 465 GB, 969021 cyl, 16 head, 63 sec, 512 bytes/sect x 976773168 sectors uhub0 at usb0: vendor 0x1033 OHCI root hub, class 9/0, rev 1.00/1.00, addr 1 uhub1 at usb1: vendor 0x1033 OHCI root hub, class 9/0, rev 1.00/1.00, addr 1 uhub2 at usb2: vendor 0x1033 EHCI root hub, class 9/0, rev 2.00/1.00, addr 1 boot device: re0 root on md0a dumps on md0b root file system type: ffs erase ^H, werase ^W, kill ^U, intr ^C, status ^T Terminal type? [vt100] Just follow the usual procedure to install a NetBSD system. Sandpoint installation window Post installation steps ======================= After a successful installation you want to make the system boot standalone when switched on, without the need for a serial console. So you have to modify the `bootcmd` in U-Boot's environment and write the `altboot.bin` binary to the Flash ROM. To find a suitable place in the Flash ROM you can use the **flinfo** command and look out for empty sectors `(E)`. On my Turbo Station I have chosen `0xffe20000`. Replace that in all the following commands if you have chosen a different address. Load `altboot.bin` into memory at `0x1000000` again, as explained above. Then execute the following commands to write it to Flash ROM:
=> protect off ffe20000 ffe3ffff
Un-Protected 1 sectors
=> erase ffe20000 ffe3ffff
. done
Erased 1 sectors
=> cp.b 1000000 ffe20000 18000
Copy to Flash... done
=> protect on ffe20000 ffe3ffff
Protected 1 sectors
Finally adapt the `bootcmd` environment string to autoboot `altboot` and start the `netbsd` kernel (which is the default name) from `wd0` on each reboot:
=> setenv bootcmd cp.b ffe20000 1000000 18000\; go 1000000 wd0:
=> saveenv
Saving Environment to Flash...
Un-Protected 1 sectors
Erasing Flash...
. done
Erased 1 sectors
Writing to Flash... done
Protected 1 sectors
The `\` is important for **setenv** not to misinterpret the `;` as the end of the command. Have fun with your mini NetBSD server!