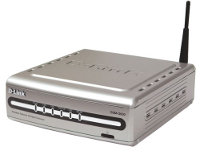
This document describes in depth how to prepare your D-Link DSM-G600 for installing NetBSD/sandpoint. Be aware that there are two revisions of the G600, which look very similar:
- Revision A, running a 266MHz ARM IXP420
- Revision B, running a 200MHz PowerPC 8241
NetBSD/sandpoint runs on the B revisions only. You can determine the revision by looking on the sticker at the left side of the case, where you should find a line starting with: HW Ver:. The following letter is either an A or a B.
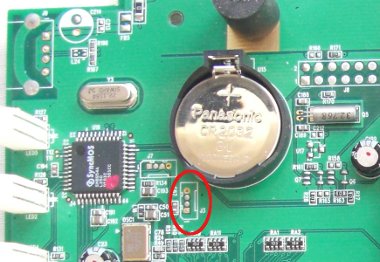
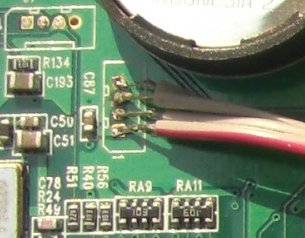 Otherwise you have to find a matching plug for the socket and connect
the serial cable to it. Or desolder the socket.
Connect a serial terminal via a converter
-----------------------------------------
The serial port on the D-Link DSM-G600 is using 3.3V TTL levels, which
have to be converted into regular RS232 levels by a level shifter
circuit. Instructions how to build such a circuit yourself can be found
here:
- [Serial adapter for 3.3V TTL](http://www.netbsd.org/ports/sandpoint/ttl2rs232.html)
Make sure that the layout of the connector fits to the pinout of the
DSM-G600's serial port, as shown above.
Another option is to buy such a converter. There are solutions for a
standard RS232 interface and for an USB interface. Look out for:
- RS232 level shifter / breakout board (MAX3232 based)
- USB to TLL serial level shifter / breakout board (FT232 based)
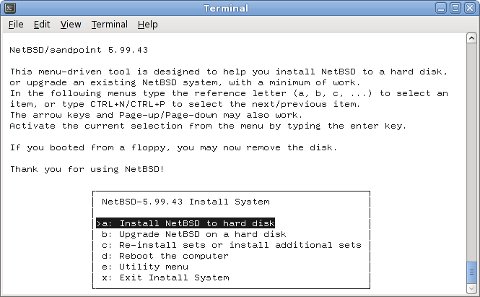
Now you can connect with any terminal program to the DSM-G600's serial
console. The easiest approach may be to use NetBSD's `tip(1)` command to
make a direct console connection at 9600bps.
# tip console
Note that when using a serial connection via USB you may have to make an
entry for `/dev/ttyU0` in `/etc/remote`.
First time installation
=======================
The altboot bootloader
----------------------
The `altboot(8)` program functions as a bridge between the U-Boot
firmware and the NetBSD kernel startup environment. NAS firmware often
provides no means to boot a kernel from disk or from the network and
doesn't initialize all hardware correctly. We will also use it to pass a
bootinfo list to the kernel.
The `altboot` boot loader has to be loaded and started using the
DSM-G600's firmware, which is `U-Boot 0.2.0`.
U-Boot 0.2.0 (May 26 2005 - 19:38:32)
CPU: MPC8245 V1.2 at 170.503 MHz:
Board: Sandpoint 8245
DRAM: 32 MB
FLASH: FUJI_DL323BE
In: serial
Out: serial
Err: serial
Hit any key to stop autoboot: 0
D-Link's U-Boot version is extremely restricted. Probably to keep it
small and to save space for a Linux kernel and ramdisk in the 4MB Flash,
but also to keep the user from hacking it. It does not allow any file
transfer besides replacing the Linux kernel image with another Linux
kernel image, and it doesn't have network support either. We can use
`altboot(8)` to overcome all those restrictions.
Write altboot to Flash
----------------------
The only way to install, or even run, altboot is to make it look like a
Linux kernel U-Boot image and let the firmware boot it instead of Linux.
So this step will overwrite your Linux installation.
To replace the Linux kernel in the Flash ROM we can use the U-Boot
command **loadb k**. This will expect an U-Boot image file to be
transfered over the serial port using `Kermit` protocol.
So the next step is to install `kermit(1)` from `pkgsrc(7)`, or to
compile and install it yourself. To configure Kermit for the file
transfer you have to provide the following commands:
set line /dev/tty00
set speed 9600
set carrier-watch off
set flow-control none
robust
set file type bin
For convenience you can write them into a file which you can pass as an
argument to `kermit`.
Run Kermit and start your DSM-G600. Quickly press a key to prevent
autobooting. Then type **loadb k** to start the file transfer:
Otherwise you have to find a matching plug for the socket and connect
the serial cable to it. Or desolder the socket.
Connect a serial terminal via a converter
-----------------------------------------
The serial port on the D-Link DSM-G600 is using 3.3V TTL levels, which
have to be converted into regular RS232 levels by a level shifter
circuit. Instructions how to build such a circuit yourself can be found
here:
- [Serial adapter for 3.3V TTL](http://www.netbsd.org/ports/sandpoint/ttl2rs232.html)
Make sure that the layout of the connector fits to the pinout of the
DSM-G600's serial port, as shown above.
Another option is to buy such a converter. There are solutions for a
standard RS232 interface and for an USB interface. Look out for:
- RS232 level shifter / breakout board (MAX3232 based)
- USB to TLL serial level shifter / breakout board (FT232 based)
Now you can connect with any terminal program to the DSM-G600's serial
console. The easiest approach may be to use NetBSD's `tip(1)` command to
make a direct console connection at 9600bps.
# tip console
Note that when using a serial connection via USB you may have to make an
entry for `/dev/ttyU0` in `/etc/remote`.
First time installation
=======================
The altboot bootloader
----------------------
The `altboot(8)` program functions as a bridge between the U-Boot
firmware and the NetBSD kernel startup environment. NAS firmware often
provides no means to boot a kernel from disk or from the network and
doesn't initialize all hardware correctly. We will also use it to pass a
bootinfo list to the kernel.
The `altboot` boot loader has to be loaded and started using the
DSM-G600's firmware, which is `U-Boot 0.2.0`.
U-Boot 0.2.0 (May 26 2005 - 19:38:32)
CPU: MPC8245 V1.2 at 170.503 MHz:
Board: Sandpoint 8245
DRAM: 32 MB
FLASH: FUJI_DL323BE
In: serial
Out: serial
Err: serial
Hit any key to stop autoboot: 0
D-Link's U-Boot version is extremely restricted. Probably to keep it
small and to save space for a Linux kernel and ramdisk in the 4MB Flash,
but also to keep the user from hacking it. It does not allow any file
transfer besides replacing the Linux kernel image with another Linux
kernel image, and it doesn't have network support either. We can use
`altboot(8)` to overcome all those restrictions.
Write altboot to Flash
----------------------
The only way to install, or even run, altboot is to make it look like a
Linux kernel U-Boot image and let the firmware boot it instead of Linux.
So this step will overwrite your Linux installation.
To replace the Linux kernel in the Flash ROM we can use the U-Boot
command **loadb k**. This will expect an U-Boot image file to be
transfered over the serial port using `Kermit` protocol.
So the next step is to install `kermit(1)` from `pkgsrc(7)`, or to
compile and install it yourself. To configure Kermit for the file
transfer you have to provide the following commands:
set line /dev/tty00
set speed 9600
set carrier-watch off
set flow-control none
robust
set file type bin
For convenience you can write them into a file which you can pass as an
argument to `kermit`.
Run Kermit and start your DSM-G600. Quickly press a key to prevent
autobooting. Then type **loadb k** to start the file transfer:
 When the installation is finished the system will automatically boot
into multiuser mode, as `altboot` defaults to boot `wd0a:netbsd`. After
the network is configured you can disconnect the serial cable and close
the case.
Have fun with your mini NetBSD server!
Known Limitations
=================
- No known method for a hardware reboot or shutdown of the board
exists. Therefore rebooting is simulated by jumping through U-Boot's
reset vector. A
poweroff(8)
will just halt the system and flashes the power LED to indicate that
it has to be switched off manually.
When the installation is finished the system will automatically boot
into multiuser mode, as `altboot` defaults to boot `wd0a:netbsd`. After
the network is configured you can disconnect the serial cable and close
the case.
Have fun with your mini NetBSD server!
Known Limitations
=================
- No known method for a hardware reboot or shutdown of the board
exists. Therefore rebooting is simulated by jumping through U-Boot's
reset vector. A
poweroff(8)
will just halt the system and flashes the power LED to indicate that
it has to be switched off manually.